Crafting Your Wooden Notebook
Follow our step-by-step guide to create your own beautiful wooden notebook. No prior experience needed!
Watch our complete video tutorial before getting started
Step-by-Step Guide

Prepare Your Materials
Gather all the components from your kit: wooden covers, paper sheets, binding thread, needle, and finishing materials.
Pro Tips:
- Work on a clean, flat surface
- Organize materials in the order you'll use them
- Have a small container for small parts

Mark and Punch Binding Holes
Use the provided template to mark where binding holes should go. Then carefully punch holes through both the wooden covers and paper sheets.
Pro Tips:
- Ensure holes align perfectly for easier binding
- Punch through a few sheets at a time for cleaner holes
- Use a soft surface underneath when punching

Thread the Binding
Following the figure-eight pattern, thread through the punched holes to bind your notebook together securely.
Pro Tips:
- Keep thread tension consistent throughout
- Double-knot at the end for durability
- Trim excess thread with scissors

Apply Wood Finish
Apply the wood finish of your choice to protect and enhance the natural beauty of your wooden covers.
Pro Tips:
- Test finish on a small corner first
- Apply in thin, even coats
- Allow proper drying time between coats

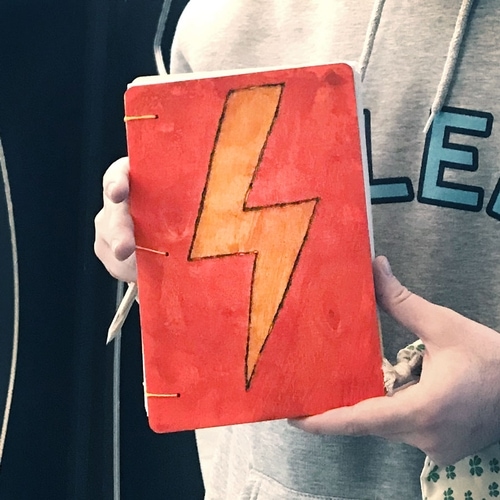
Personalize Your Notebook
Add your personal touch with engraving, painting, or decorative elements to make your notebook truly unique.
Pro Tips:
- Sketch your design lightly in pencil first
- Use masking tape for clean paint lines
- Consider the wood grain when designing
Materials You'll Need
Wooden Covers
Pre-cut wooden pieces for front and back covers
Paper Sheets
High-quality paper cut to size
Binding Thread
Durable thread for notebook binding
Binding Needle
Special needle for bookbinding
Hole Punch
Tool for creating binding holes
Wood Finish
Natural oil or varnish for protecting wood
Troubleshooting
My binding thread keeps tangling?
Cut a shorter length of thread and apply a small amount of beeswax to reduce friction.
The wooden covers warped after finishing?
Place the covers under heavy books for 24 hours to flatten. In the future, apply thinner coats of finish.
My holes don't align properly?
Use the provided template and punch through all materials at once to ensure alignment.
The binding feels loose?
Re-thread with consistent tension throughout, and double-knot at the end.
Community Creations
Get inspired by these beautiful notebooks created by our community
Need Help?
Have questions or need assistance with your wooden notebook project? Our team is here to help you create something beautiful.